Not every piece of information you need will be in a table. For instance, if you want to know the profit of a product you sell, that value probably isn’t stored at the table level. Instead, you must use an expression that subtracts the cost of manufacturing and/or distributing the product from the price of the item. Normally, you don’t store the result of a calculation in a table. Rather, you use an expression to return the profit when needed.
In this tutorial, I’ll show you how to create a calculated column to return important information that’s not otherwise stored at the table level. You can then add the column to visualizations or create new ones based on the new column.
Jump to:
I’m using Power BI Desktop on a Windows 11 system using Microsoft Fabric. You can use Power BI Service, and Fabric isn’t required; however, there may be subtle differences between the instructions and screenshots.
You can download the demonstration .pbix file, AdventureWorks Sales from GitHub. Once downloaded, double-click the .pbix file to open it in Power BI and follow along, or use a .pbix file of your own. If you want a sneak peek at the final results, check out this demo file.
If you’re familiar with Power BI measures, you might be wondering about the difference between those and calculated columns. Both are based on Data Analysis Expressions. The main difference is that you usually add a measure to a visualization by adding it to the Values bucket. In contrast, a calculated column is a new field at the table level that can be added to rows, axes, legends and groups.
SEE: Here’s how to add quick measures for complex calculations in Microsoft Power BI Desktop.
Calculated columns and measures might seem interchangeable, and sometimes, it won’t matter. When deciding which to use, context is the determining factor:
Now that you’ve got an idea of what calculated columns can do, let’s create one.
When adding a calculated column, you must use related data if you’re working with more than one table. Sometimes all of those values will be in the same table, so the relationship won’t be a factor. We’ll use a calculated column to return a simple profit margin based on two fields in the demonstration .pbix file’s Product table. When applying this to your own work, be sure to check for Relationships in the Model window if you’re working with two or more tables.
To add a calculated column to the Product table:
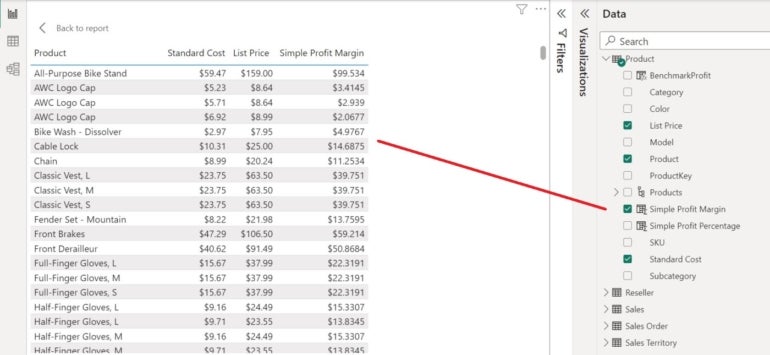
Simple Profit Margin = Product[List Price] - Product[Standard Cost].Figure A

Now, let’s display the new field in a visualization:
Figure B

This simple formula subtracts Standard Cost from the List Price. Remember, if you base a visualization on the Product table and add the new column to it, Power BI will calculate the profit margin before the user clicks a filter. In addition, Power BI stores the profit values in the model, so they are available to other visualizations.
The Simple Profit Margin calculated column doesn’t take into consideration any applied discounts and many other factors. It is, as named, a “simple” profit margin. As it is, viewing these values doesn’t help us much, but a percentage would.
Let’s add another calculated column that will return the percentage of profit for each product. Seeing the simple profit as a percentage will be more helpful. To do so, repeat the process above, using the formula shown in Figure C:
Simple Profit Percentage = ('Product'[List Price] - 'Product'[Standard Cost]) / 'Product'[List Price]
Figure C

To change the format for this column from currency to percentage, choose Simple Profit Percentage in the Fields pane, and then choose Percentage from the Format dropdown in the Formatting group on the Column Tools tab.
SEE: Here’s more on how to calculate profit margin in Microsoft Power BI using a calculated column.
The addition of this column may change the sort order, but don’t worry about it. Both calculated columns are simple in structure, but they return helpful information. Profit margins run from 23% to over 64%. This is much better information than the currency profit returned by the first calculated column. Fortunately, Power BI can handle much more complex formulas.
A calculated column evaluates a returned value for every record in the table; however, that doesn’t mean you won’t want to filter those results. Fortunately, it’s easy to aggregate the results in a conditional manner for further filtering possibilities.
To illustrate, let’s add a calculated column that notes whether the profit margin is below or above 40%. To get started, repeat the process for adding a new column to the Product table and enter the following formula:
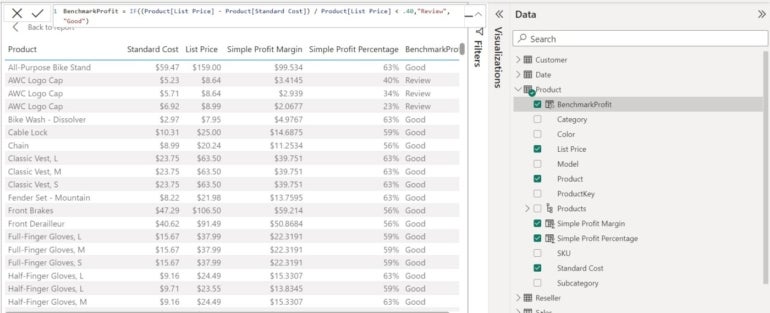
BenchmarkProfit = IF((Product[List Price] - Product[Standard Cost]) / Product[List Price] < .40,"Review","Good")
This simple formula returns “Good” if the profit margin is 40% or higher and “Review” if it isn’t, as you can see in Figure D.
Figure D

At this point, you could sort or use filters to display the results the way you want. Doing so can be accomplished in other ways, so a calculated column isn’t the only solution in this circumstance.
So far, everything needed has been in the same table, but you can add a calculated column that depends on values in another table. Remember, the calculated column evaluates every record in the table, and there may be more efficient solutions than a calculated column.
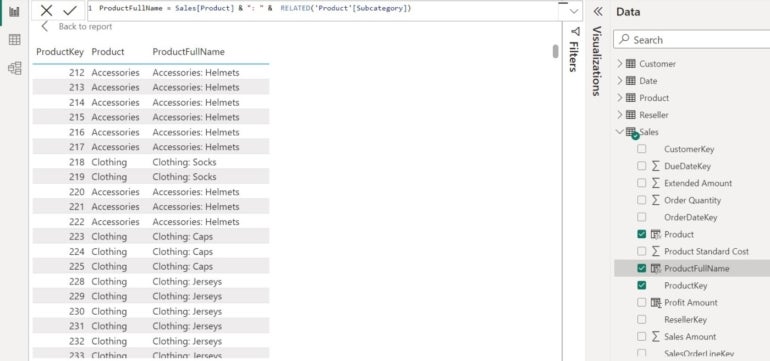
To illustrate this flexibility, let’s add a calculated column that combines two strings. Specifically, let’s add a calculated column to the Sales table that displays the product name and subcategory for each record in the Sales table. The subcategory values are in the Product table.
To get started, click the plus sign near a page tab to add a new page and do the following:
ProductFullName = Sales[Product] & ": " & RELATED('Product'[Subcategory])Figure E

You’ll notice that the formula uses the RELATED function to reference the table that isn’t in the active table, Sales. This function references a field in a related table and returns a value by evaluating the current row. That’s it, but there is one requirement: This function requires a many-to-one relationship between both tables. If no relationship exists, you must create one or find another solution. Fortunately for us, this relationship already exists.